Everything You Need to Know About Retopology: The Complete Guide to Optimizing 3D Models with Blender

If your 3D model looks great but lags, breaks, or refuses to animate cleanly, it won’t get very far. That’s where retopology comes in. By rebuilding your mesh with cleaner geometry, retopology makes your models easier to animate, faster to render, and ready for real-time use in games, immersive XR experiences, and beyond.
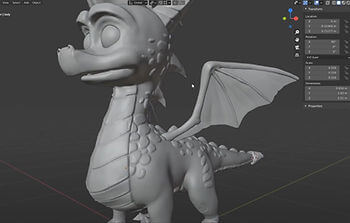
In this beginner-friendly guide on everything you need to know about retopology, VIVERSE has teamed up with Jamie Dunbar, a 3D artist and educator with over 15 years in the animation industry. His instructional video below explains how retopology is used to optimize assets for games, animation, and VR with Blender’s 3D creation tools. This guide has organized Jamie’s most important insights into bite-sized pieces of information and will feature a comprehensive FAQ section. We have added timestamps throughout the guide for Jamie’s video so you can see it in action yourself.
What Is Retopology?
Retopology is the process of rebuilding the mesh of a 3D model to improve its structure for animation, texturing, and rendering. While it often involves reducing the polygon count to make the model more lightweight and efficient, it can also involve increasing polygons or rearranging topology to add detail, fix mesh flow, or correct deformation issues during rigging and animation.
Why is Retopology Necessary?
3D models can range from extremely detailed copies of things in real-life to simple 3D-animated sketches, so it’s important to understand how many polygons your 3D model needs.
This is where retopology comes in. Retopology offers many benefits to the 3D productions pipelines, including:
- Improved performance: Reduces computational load and speeds up rendering (loading).
- Better animation deformation: Adding or modifying features is crucial for natural, believable animations. Retopology takes out all unneeded elements to do this better.
- Optimized UV mapping: Simplifies UV layouts and enhances texture quality.
- Enhanced texturing and map baking: Helps efficient and accurate painting of textures and addition of elements.
- Strategic detail control: Allows precise placement of details.
- Versatility and compatibility: Enables models to function effectively across diverse platforms.
Typical Retopology Patterns in Blender
For a visual step-by-step process, continue reading and watch along with Jamie’s tutorial shared above. For a concise summary of the manual retopology workflow in Blender, using terminology from official documentation and widely referenced tutorials, we’ve outlined the process for you.
- Create the Base MeshStart by laying out the initial topology using the Extrude tool (E) or by using CTRL + Right Click to extend new geometry along the contours of the high-poly surface. This forms the foundation of your new mesh.
- Fill Gaps and Connect GeometryUse the Fill tool (F) to create faces between selected vertices or edges, bridging small gaps and/or connecting isolated geometry.
- Optimize TopologyInsert additional edge loops with Loop Cut (CTRL + R) to ensure even polygon distribution and to maintain proper edge flow that follows the surface curvature.
- Adjust Edge PlacementRefine the mesh by sliding edges with Edge Slide (GG), for precise control over edge flow and smoother surface transitions.
- Simplify GeometryUse Dissolve (CTRL + X) to remove unnecessary vertices or edges, helping to simplify the mesh and prevent unneeded subdivisions during future editing.
| Tool Name | Shortcut | Description |
| Extrude | E | Extends new faces from existing edges or faces; a core operation for creating new geometry. |
| CTRL + Click | CTRL + Right Click | In Edit Mode, CTRL + Right Click creates a new vertex or edge at the cursor position; commonly used for quickly expanding the mesh. |
| Fill | F | After selecting two or more vertices/edges, pressing F creates a new face; useful for filling holes or manually connecting areas. |
| Loop Cut | CTRL + R | Inserts a new edge loop into the mesh; used to add detail or adjust topology structure. |
| Edge Slide | GG | Slides selected edges along adjacent edges, making it easier to optimize edge flow. |
| Dissolve | CTRL + X | Removes selected edges/vertices without breaking the mesh structure; useful for simplifying unnecessary subdivisions. |
Practical Retopology Guide in Blender
In contrast to the earlier section on common patterns, this part provides a practical, step-by-step retopology guide based on Jamie Dunbar’s Blender tutorial. Jamie also thoughtfully prepared a practice model for everyone to follow along with the lesson—just enter the discount code “free” at checkout to download it for free!
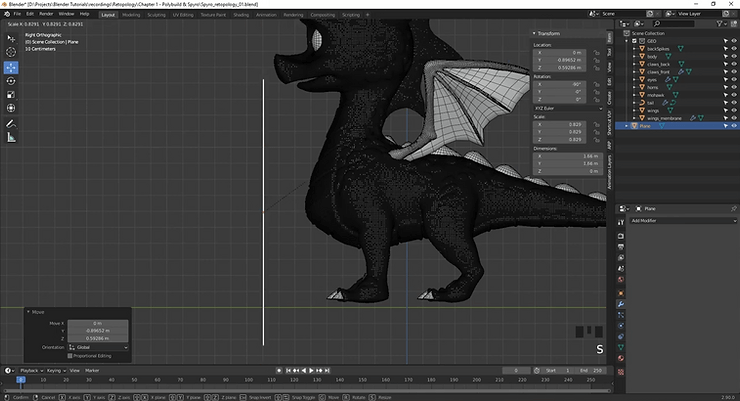
Setting Up the Workspace
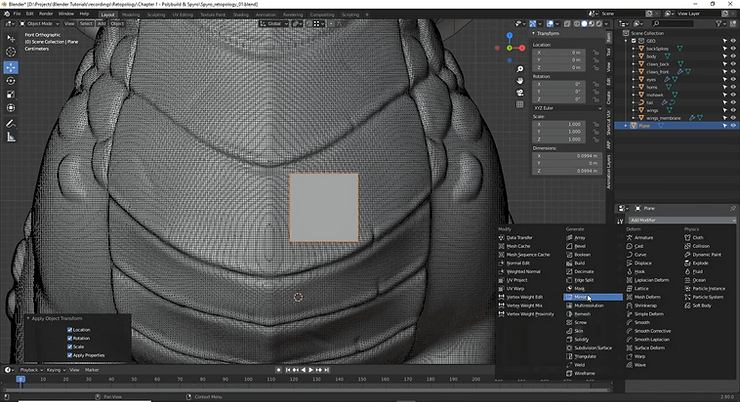
Create a plane as your retopology mesh. Reset its position with ALT + G and ALT + R, then rotate it 90 degrees to display the right view. Position and scale it to fit the chest area ridges. Since some modifiers use real-world units, use Apply All transforms to avoid potential issues.
(🕒 03:10–03:49)
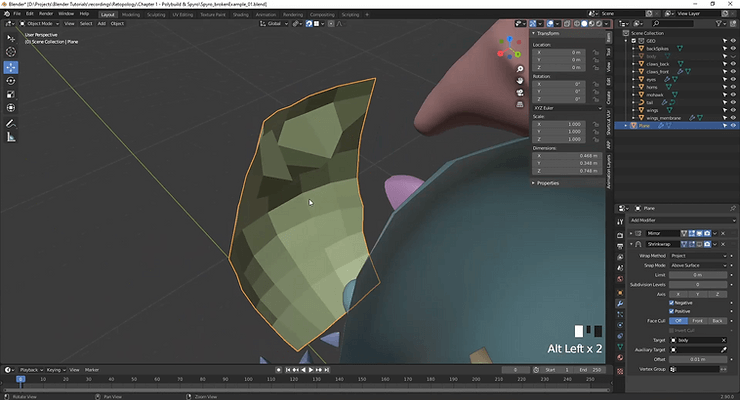
Add a Mirror Modifier so you only work on one side. In Edit mode, enable Clipping to prevent vertices from crossing the center line – this makes the workflow much cleaner.
(🕒 03:50–04:26)
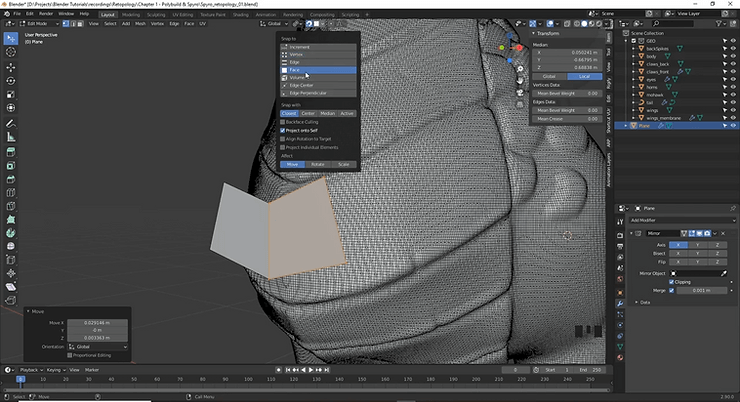
Configuring Snapping and Shrinkwrap
Set up Snapping to “Face” mode and enable “Project Individual Elements” so vertices snap properly to the sculpted mesh rather than projecting entire faces. (🕒 04:26-05:20)
Add a Shrinkwrap Modifier with these settings:
- Target: Your sculpted body
- Wrap Method: Project
- Snap Mode: Above Surface
- Enable both Positive and Negative directions
- Add minimal offset (around 0.01) to prevent mesh penetration
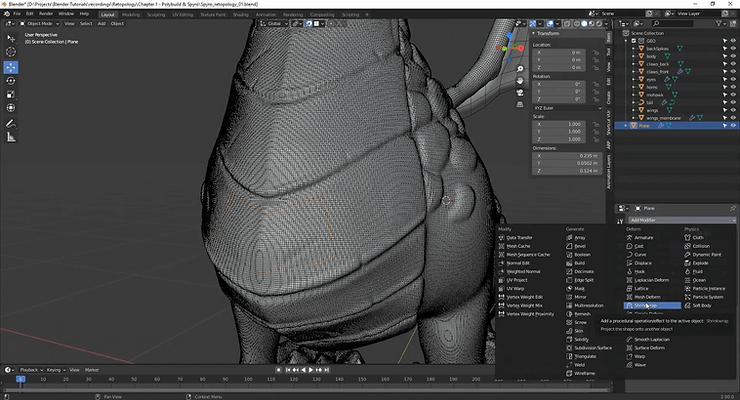
Keep the offset as low as possible – higher values distort the shape and reduce accuracy.
(🕒 05:21-06:16)
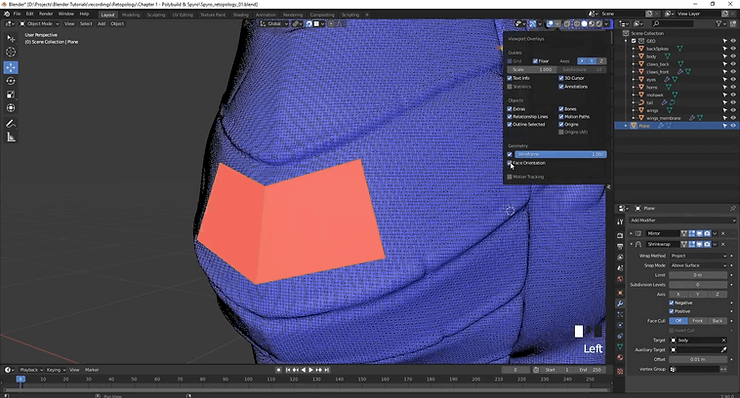
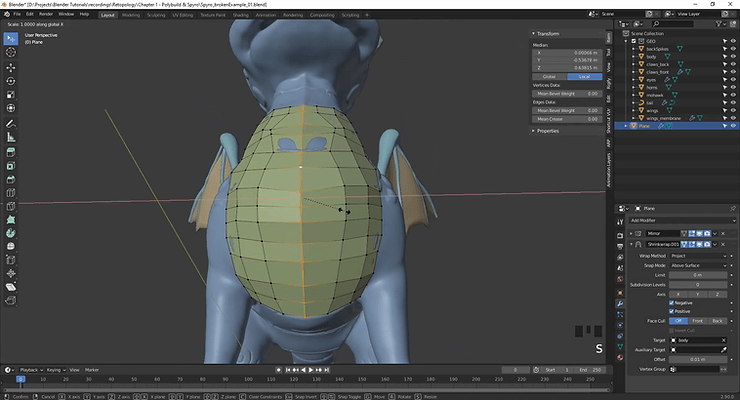
Fixing Visual Issues
If faces appear red in Face Orientation mode, recalculate normals with SHIFT + N or ALT + N > Flip. Enable “Cage” in the Shrinkwrap modifier for better visual accuracy. (🕒 06:17-08:25)
For easier visualization:
- Change viewport shading to “Random” for distinct mesh colors
- Turn off wireframe on the dense sculpted mesh
- Optionally enable “In Front” in Object Properties > Viewport Display
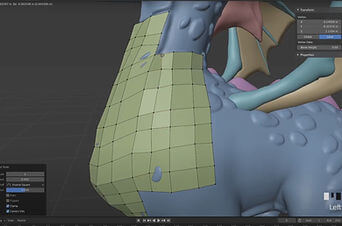
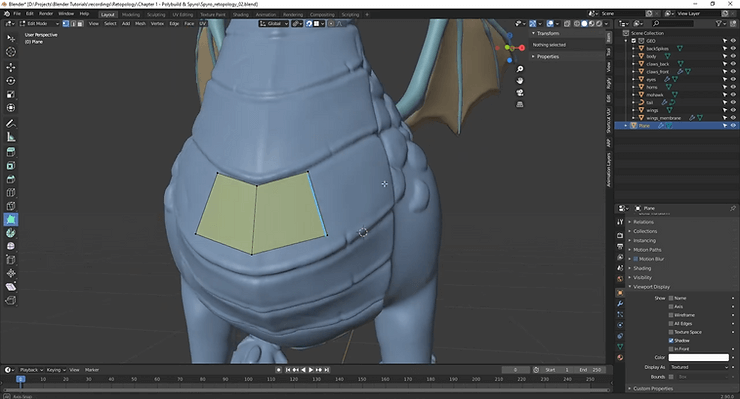
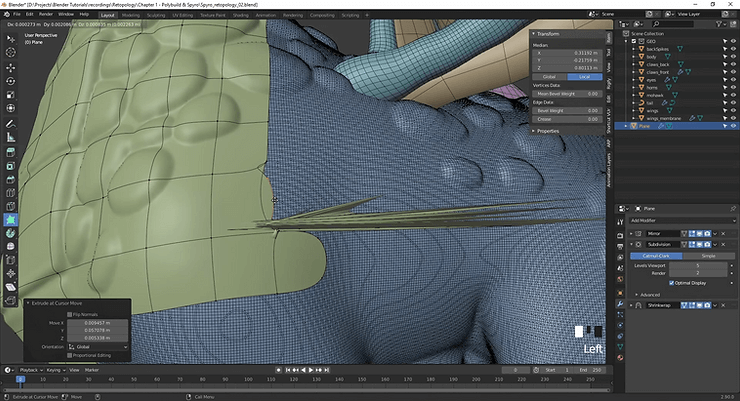
Using the Poly Build Tool
The Poly Build tool shows blue highlights on vertices (for repositioning) and edges (for extrusion). Click and drag blue lines to create new geometry, then reposition vertices as needed. (🕒 08:26-10:29)
Key advantages:
- Works seamlessly with other tools
- Use CTRL + R for loop cuts without switching tools
- CTRL for beveling
- All operations return to Poly Build automatically
Auto Merge Option
Activate Auto Merge (under Options) to automatically merge nearby vertices when editing geometry. Adjust the merge threshold—around 0.01 typically works well for models at real-world scale (~3 meters). This allows vertices to seamlessly snap together during extrusion or repositioning, significantly speeding up the workflow.
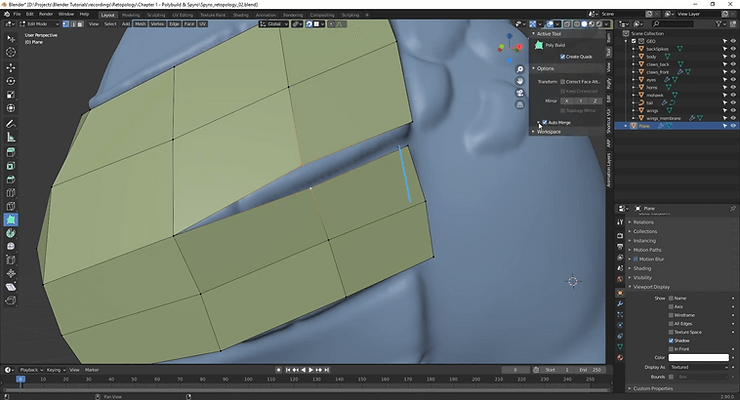
Additionally, holding CTRL while dragging edges lets you quickly form triangles that Blender automatically converts into quads whenever possible. Use this to efficiently manage complex corners and fill gaps rapidly. For batch operations, switch temporarily to the Tweak tool: select multiple edges, press E, and extrude entire edge loops simultaneously—just ensure proper camera angles to avoid unwanted snapping behavior. (🕒 10:30-14:01)
Fixing the shrinkwrap modifier
Shrinkwrap sometimes causes vertices to behave strangely. For instance, moving one vertex can unexpectedly distort nearby vertices. This happens because vertices are snapping excessively due to the shrinkwrap modifier.
To clearly see the issue:
- Temporarily disable the shrinkwrap modifier.
- Notice vertices drastically shift from their intended position when toggled.
A quick manual fix is possible if you know the problematic vertices. However, if this occurs across multiple areas:
- Duplicate the shrinkwrap modifier (keeping a backup).
- Apply the original shrinkwrap to fix vertex positions permanently.
- Correct center line distortion (select center edges with SHIFT + ALT + Click, then scale along X-axis by pressing S, X, and 0).
- Slightly shift along the X-axis if necessary.
This method stabilizes vertex positions, eliminating unexpected snapping and improving overall mesh accuracy. Don’t hesitate to reapply shrinkwrap—it’s often the quickest solution. (🕒 14:02-18:34)
Testing Your Retopology
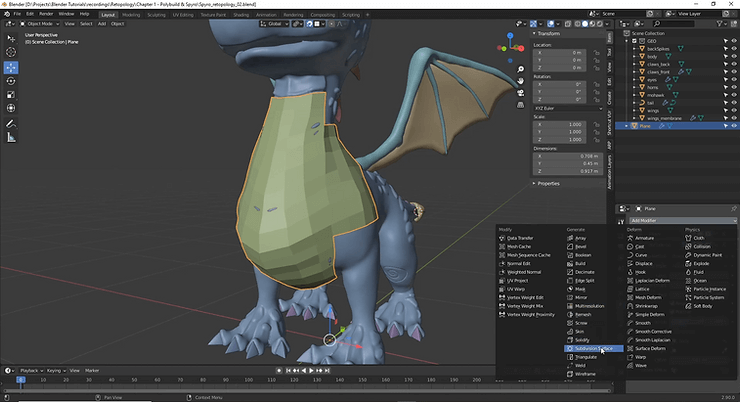
Add a Subdivision Surface modifier above the Shrinkwrap to test your topology. Set viewport levels to 3-4 to see how well your edge flow captures the original detail. If using Multi-res for final output, note that it doesn’t play well with Mirror modifiers.
Apply Shrinkwrap periodically during testing to fix distortions, then recreate it with the same settings. Enable smooth shading to better evaluate the surface quality.
(🕒 18:35-20:57)
Important Working Tips
Never work with Subdivision Surface active during retopology. The curved edges make it impossible to see actual vertex positions, causing:
- Unclear vertex placement
- Strange distortions during extrusion
- Difficult vertex merging
- Unpredictable Shrinkwrap behavior
Always disable or delete Subdivision Surface while working, then add it back for testing. Get your base mesh correct first, then apply subdivision for refinement. This workflow proves that Blender retopology is not only possible but reasonably intuitive. However, the need to frequently reapply modifiers (especially Shrinkwrap) can slow down the process.
SpeedRetopo, which was free at the time this video was recorded, is now a paid add-on ($10 USD / 1 user). It combines several retopology tools into a streamlined interface, helping speed up modifier management and workflow.
Another choice is Instant Meshes, an automatic retopology tool that works very quickly, though it doesn’t offer the same level of control and precision as manual retopology.
(🕒 20:58-23:17)
Effective Retopology Strategies
Retopology can be challenging without a clear plan. Follow these core strategies to streamline your workflow and produce clean, animation-friendly models efficiently:
- Master Basics First:Get comfortable using Blender’s native Poly Build tool before transitioning to advanced add-ons.
- Optimize Your Workspace:Use essential modifiers strategically:
- Mirror Modifier: Ensures symmetrical retopology.
- Snapping Tool: Set to “face” and enable “project individual elements” for precision.
- Shrinkwrap Modifier: Use the “Project” method with minimal offset to accurately align new topology.
- Maintain Correct Normals:Regularly check and recalibrate normals (SHIFT + N or ALT + N) to avoid Shrinkwrap issues.
- Clear Visual Management:Enable random shading, disable dense wireframes, and optionally use the “in front” viewport display to maintain clear visibility.
- Keep Topology Simple:Avoid modeling small details manually. Utilize displacement or normal maps for intricate features.
- Frequent Modifier Checks:Regularly apply and recreate modifiers to swiftly resolve emerging topology issues.
Following these practical strategies ensures smooth, effective retopology, leading to optimized models suitable for animation and further detail refinement.
More Retopology Software Options
Beyond Blender’s native tools, several other powerful retopology solutions are available to enhance your workflow. Select retopology software based on your budget, use-case, and skill level:
Dedicated Professional Software
- TopoGun 3: A highly specialized professional tool, ideal for detailed tasks like baking multiple map types (normal, displacement, AO). It’s robust and reliable but comes with a higher price tag.
- Instant Meshes: A free, open-source solution that’s quick and easy to use. It’s perfect for simple tasks and rapid prototyping, though it lacks advanced features.
Integrated Tools in 3D Software
- ZBrush ZRemesher: Outstanding for organic models, offering powerful automated features and excellent sculpting integration. However, it may be less effective for hard-surface models.
- Maya Retopology Tools: Known for their precise edge-flow control, these tools integrate seamlessly into animation workflows. They offer exceptional functionality but come at a premium cost.
- 3DCoat Retopo Room: Combines automated and manual retopology methods effectively, suitable for both organic and mechanical shapes. It provides extensive customization but can be challenging for beginners due to its complex interface.
Blender Ecosystem
- Built-in Tools: Free and straightforward, suitable for beginners looking to learn retopology basics.
- RetopoFlow 3: An intuitive and efficient plugin that simplifies complex retopology processes, offering a good balance of affordability and functionality.
- QuadRemesher: A popular, affordable plugin delivering high-quality automated retopology based on model details and curvature.
Quick Recommendations:
- Limited Budget or Beginner: Choose Blender built-in tools or Instant Meshes for an easy start.
- Moderate Budget or Intermediate User: Consider QuadRemesher or RetopoFlow 3 for more robust capabilities.
- Professional or Advanced User: Opt for TopoGun 3, 3DCoat, or Maya to handle advanced professional tasks.
Specific Use-case Recommendations:
- Organic Modeling: ZBrush ZRemesher, 3DCoat
- Hard-Surface Modeling: TopoGun 3, Maya
- Rapid Prototyping: Instant Meshes, QuadRemesher
Frequently Asked Questions (FAQ)
- When in the 3D creation process is retopology typically needed? Retopology is typically needed when a high-resolution model needs to be optimized for animation, texturing, or real-time use. It rebuilds the mesh into a cleaner structure that loads efficiently, deforms predictably, and supports UV mapping and baking—essential for games, animation, and immersive XR & VR experiences.
- What’s the main difference between manual and automatic retopology? Manual retopology means creating the new topology by hand using 3D modeling tools for maximum precision. Automatic retopology relies on software and plugins to generate topology, which can be faster but less accurate. In the comparison image below, you’ll see an example of manual retopology on the left; and automatic retopology, with less-than-optimal topology present, on the right.
- Why is learning manual retopology beneficial, even if automatic tools exist? Manual retopology gives you full control over edge flow, which is important for animation. It ensures your mesh bends predictably at joints, supports rigging and shape keys, and avoids artifacts that automatic tools often miss. This level of precision is essential for animation-ready assets. Sources: Autodesk: Retopology Solutions, CG Cookie: Introduction to Retopology
- What makes topology “good,” and why are four-sided faces (quads) so important? Good topology has a clean, organized edge flow that deforms well during animation. Quads are important because they support loop cuts, easier UV unwrapping, and subdivision, while triangles and n-gons often cause issues.
- How do I start setting up my scene in Blender for manual retopology? First, back up your high poly model (optional: decimate it for better performance). Then, add a plane for your mesh. Enable snapping (face, project individual elements), and apply a Shrinkwrap modifier targeting your high-poly mesh. Add a Mirror modifier with clipping for symmetrical models. Assign a distinct viewport color and enable “On Cage” in Shrinkwrap.
- What Blender tools help me place new geometry precisely on high-poly models? Use face snapping with “project individual elements” and the Shrinkwrap modifier (Above Surface+small offset) to accurately position geometry. These tools are especially useful when loop cuts don’t auto-project.
- What are essential modeling techniques for building the new retopology mesh? Use Extrude (E), CTRL + Click, Fill (F), Loop Cut (CTRL + R), Edge Slide (GG), and Dissolve (CTRL + X). Enable Auto Merge when useful. Add-ons like F2 and LoopTools speed up filling and smoothing.
- What is edge flow and how should I approach it when building topology, especially for complex shapes? Edge flow refers to the logical direction and connection of polygon rows. For complex shapes, follow anatomical forms like eyes, mouth, and limbs. Then, build major topology loops (islands) and refining within them.
- How can I keep the fine details from my high-poly sculpt after creating a lower-poly retopology? Bake normal maps from the high-poly model and apply them to the low-poly mesh. You can also duplicate the mesh, apply Shrinkwrap + Subdivision modifiers, then use the Multires modifier + Reshape to transfer sculpted details.
- After I’m done creating the new topology, how do I finalize it and make it look smooth? Apply your modifiers (Mirror, Shrinkwrap). Disable snapping. Use Shade Smooth, Subdivision Surface, and tools like Smooth Vertices or Slide Relax in Sculpt Mode to polish the mesh.
Final Thoughts
Retopology is a must-have for clean, efficient, and production-ready 3D assets. Whether you’re working in animation or VR, mastering topology and edge flow will take your 3D model’s efficiency and usability to new levels.
While automatic retopology tools offer convenience, manual retopology ensures full control over your mesh, and will give you a deeper understanding of what makes up a 3D model.
However, the work is worth it. Creating these amazing projects is fun; and sharing them with the world is easy and free to do with VIVERSE, your host and distribution hub for 3D projects.
All you need to do is set up a profile (just like a channel on YouTube), create a World, and add your 3D models to them. Share them for all to see, build a community of friends and fans, and join the VIVERSE community today!
About the Video Author: Jamie Dunbar

Jamie Dunbar is the founder of Dragonboots Studios and brings over 15 years of experience in 3D animation to his work. Specializing in character creation, he has developed innovative approaches, like his Creature Kitbash addon—a LEGO-like sculpting tool for creating monsters—which allows artists to quickly design creatures through modular components. His expertise in educational animation combines technical ability with storytelling to help others master the art of 3D animation.